Painting technique
Thi is a short overview of layers created by using Flemish master’s technique. It is a complex process.
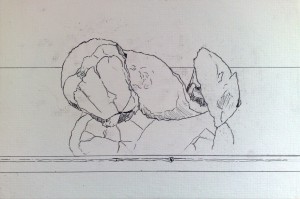
Pencil or charcoal drawing, ink pen rawing 1. Imprimatura 2. First umber under painting 3. Second umber underpainting 4. Monochromatic underpainting 5.6. First and second color layers 7. The brightest parts of the image
Using media: Dammar varnish, linseed oil, turpentine or Maroger
The first essential step for creating an image is to prepare a good base foundation. For this technique I use acrylic primed fine linen from the prestigious Italian manufacturer PER BELLE ARTI or modern ACM panels. Even if you buy pre-prepared canvas it still needs to be additionally primed to suit our needs. Canvas should be primed several times (about 3-4 times). Apply primer with pallet knife. The canvas should be sanded among the layers of gesso by fine sandpaper or razorblade. In this way you obtain a smooth surface on which the structure of the canvas is almost invisible.
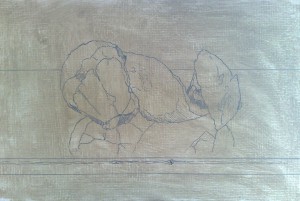
The drawing is performed by charcoal or pencil according to the needs. Then after drawing is done outline entire drawing with ink pen. Before starting the painting is necessary to coat the canvas with linseed oil (doing it because the color adhere better to the canvas and also helps to improve the mixing of color on the canvas itself), and thus the original drawing done in pencil or charcoal is deleted. Apply linseed oil on surface of the canvas by your hand and spread evenly over the entire surface. Then carefully scrape off with razorblade excessive oil and thus the dust that settle on the canvas. Use a dry cloth to wipe the canvas and remove excessive oil.
Using media: Dammar varnish, linseed oil, turpentine or Maroger
The first essential step for creating an image is to prepare a good base foundation. For this technique I use acrylic primed fine linen from the prestigious Italian manufacturer PER BELLE ARTI or modern ACM panels. Even if you buy pre-prepared canvas it still needs to be additionally primed to suit our needs. Canvas should be primed several times (about 3-4 times). Apply primer with pallet knife. The canvas should be sanded among the layers of gesso by fine sandpaper or razorblade. In this way you obtain a smooth surface on which the structure of the canvas is almost invisible.
The drawing is performed by charcoal or pencil according to the needs. Then after drawing is done outline entire drawing with ink pen. Before starting the painting is necessary to coat the canvas with linseed oil (doing it because the color adhere better to the canvas and also helps to improve the mixing of color on the canvas itself), and thus the original drawing done in pencil or charcoal is deleted. Apply linseed oil on surface of the canvas by your hand and spread evenly over the entire surface. Then carefully scrape off with razorblade excessive oil and thus the dust that settle on the canvas. Use a dry cloth to wipe the canvas and remove excessive oil.
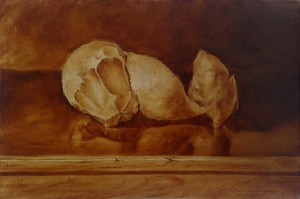
1. First oil layer - the imprimatura. It is difficult to start painting on a pure white canvas. Excessive contrast may cause that the color appears darker example on a white background than when painted on the basis of the dark. For this reason imprimatura allows better judgments about the tone of the subsequent layer. Color for this layer should have olive tinged but sometimes it is a matter of personal taste. Imprimatur is composed of lead white, yellow ocher, bone black, and if necessary small addition of Prussian blue and burnt umber. Tone of imprimatura layer should match the brightest points of the future picture. Imprimatura dries about one week.
2. Second oil layer - burnt umber underpainting. When painting this layer, we focus on the details of our painting. This second layer also determines the proportion of light and shadow in our composition. This monochromatic under painting should be executed with the utmost precision (even if in other phases of the image will be over painted). When painting handle with paint almost like you are using watercolor. Medium for this layer is composed of about 90% and 10% turpentine dammar crystals. The first under painting dries about a week (depending on conditions)
3. Second underpainting. At this stage, we are working on tonality of painted subjects. It is necessary to properly compare the tonality of the elements of our image. As well as improving detail and contrast from the previous layer. In this stage we can use a larger brushes than in the first under painting.
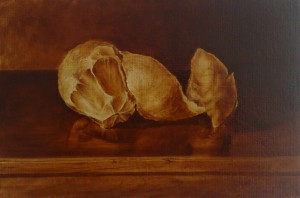
4. Monochromatic underpainting - Grisaille. This additional layer will prepare our painting for additional color layer. It is important to prepare in advance 3-5 shades of gray. The color for grisaille should be prepared of the colors that we used for the imprimatur. We can make grisaille warm or cold (by hand-painted motif). When painting areas in the shade use thin and translucent layers. Illuminated and the brightest areas of the painting has to be painted more impasto
5. First color layer - Before starting the work, be sure to coat the canvas with oil. The amount of paint applied on this layer is small. Let the grisaille shine through first color as far as possible (mainly in halftones). The first color layer should be one tone lighter and more colorful in bright areas of the picture and colorful and darker in shadow areas. For now, do not focus too much on the details and texture of the painted object. For now, we use a limited palette of colors (white, cadmium yellow dark, yellow ochre, kraplak, burnt umber, bone black) + colors that we used in the previous layer. In this stage is very important to not over do it. Leave work on the details and textures of painted object to the next color layer.
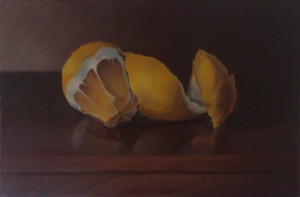
6. Second color layer. In the next layer we pick up the tone and color. The focus should be on creating details and also some textures of painted object.
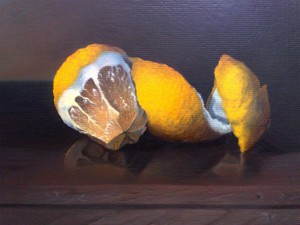
7.Third color layer - details. In this last stage we are painting the brightest parts of the image such as reflections, highlights etc. Wait six months until the image has dried sufficiently then you can apply final varnish